
How to send a lot of photos over email – a step by step guide

Email is still one of the easiest ways to keep in touch with someone, however it wasn’t originally designed for sending large multimedia files like photos.
Use this step-by-step guide to avoid some common problems when sending large numbers of pictures via email.
Although instant messaging services like Whatsapp are more popular than ever, email remains the universal online communications standard.
But it’s not great at everything – if you’ve tried before to send a large number of big file attachments, you might have run into difficulties such as message rejections, failed sending and more.
This problem only becomes more difficult as camera and smartphone image file sizes continue to increase. For the purpose of this article, we’re going to assume that you have a collection of image files, probably from the memory card of your compact camera.
The same suggestions can apply to any collection of images, even from iPhone/Android phones or tablets, however for a large amount of image files, we recommend transferring them to a laptop or desktop first as it makes it easier to deal with compared to using a mobile device.
1. First, check the total size of the files you want to send
Collect or copy all the photos you want to send into a single folder on your computer. If you only want to send specific photos out of a large batch, it’s worth creating a temporary folder and copying those photos into that folder, for easier management.
Now, check the total size of the files you want to send. In Windows, you can do this by selecting all the files in the folder (you can press Ctrl-A while in the File Explorer window to select all files), then right-clicking on the selection, and choosing “Properties” (for Macs, see here for how to check the total size).
- Take a note of what the combined size is (in MB or GB), because you might need this to see if it’s over the file attachment size limits for your email provider (and you can also use it for estimating the time to upload below).
2. How long will it take to upload?
If you’re on a slow or mobile Internet connection it’s sometimes useful to know how much time the file/attachment upload will take. We’ve made a useful little calculator to work this out, but first check your upload speed at speedtest.net for example.
Now enter the total file size, and upload speed to get an upload time estimate.
(for 1GB file size, enter 1000MB etc.)

File size: MB Your upload speed:
Note that this is assuming that you’re connecting to an Internet mail service such as Gmail, Yahoo mail etc. – if you’re using a mail system that’s on a local network such as a corporate intranet, the upload speeds will usually be much faster.
- If it looks like it’s going to take too long to upload, try the next step, which can effectively reduce the upload time.
3. Reduce photo size if necessary
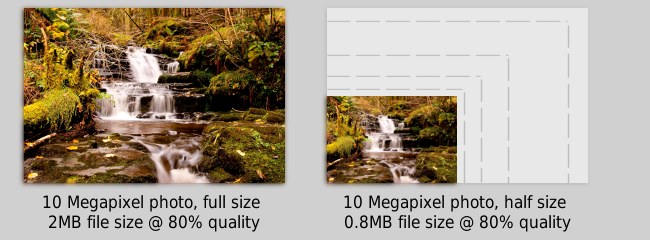
- If you’re not sending images that will be printed at some stage, it’s rarely necessary to send them as the original, full resolution versions.
- Even halving the photo dimensions will not usually reduce quality that much, and in many cases can even make photos look sharper (digital cameras frequently push the limits of their sensor resolution via interpolation when using the largest photo size modes).
- This will also significantly reduce the file size (and upload times) – you can reasonably expect files to be less than half of the original size (and up to 10 times smaller if the original was saved at too high a quality).
You’ll probably want to use some software that can do this automatically for multiple images:
Windows – A good option for batch photo resizing is Irfanview. After installing, select “Batch conversion/rename” from the File menu. There are a lot of options here, but all that needs to be done is select the image files from the file browser in the top-right, then click on “Add” to add them to the list of images to be processed (small note – there appears to be a bug in Irfanview where the “Add” button might not work when only a single file is selected. If this happens, you can instead double-click on the file to add it to the list).
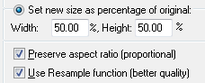
- Now click on the “Use advanced options” checkbox, and then the “Advanced” button beside it. This will open a dialog with even more options, however, all that needs to be selected here is the “Resize” checkbox, then in the “Set new size as percentage of original” boxes, put in 50% (it will use this for both width and height).
- Click OK in the Advanced settings to go back to the Batch Conversion window. Now, the only other option to point out here is “Output directory for result files”. This is where the newly resized images are placed, so change it if necessary. Now click “Start Batch” and your images will be converted.
Mac – You can easily resize images using the Preview tool, see here for details. Note that you can select “percent” instead of “pixels” to get more consistently resized images.
Chromebook – Batch image resize options are currently a bit more limited on Chromebooks, however you could try the Bulk Resize Photos free Chrome Store app.
4. Put all the images into a single file
If you have more than 5 or 6 photos to send, it’s going to be much easier to send them as a single archived file (e.g. ZIP file).
To create file archives, we’re using 7-Zip (Windows) as it’s free and high performance, however there are many options available here.

After installing, simply select all of the files you want to add, right-click on the group and “Add to archive..” (image above). It will create a single “.zip” file with all of your photos in it.
On Macs, selected the files then Control-click and select “Create Archive”. For Chromebooks, see here.
If you have previously resized the images, you may have two copies of each photo (small and large), so check that you’re only selecting the smaller versions when creating the archives.
Since image files are usually already compressed (unless you are using raw format photos from digital SLRs), this won’t save much space, but it’s still convenient to have all of the images contained within a single archive file.
5. Send the photos

Files can be sent as attachments within an email, but there are some restrictions – it’s similar to the way that parcels & packages in the postal system have a certain amount of capacity for items sent.
Due to physical limitations on storage space and network bandwidth, email providers have upper limits on the maximum size of attachments that can be sent and/or received. For the most popular mail services, this is currently about 25MB per message, for both sending and receiving attachments.
25MB is not all that generous in terms of photo and video files, but at the same time, it becomes more difficult to handle large files when they are embedded within emails. To solve this problem, most email providers offer an alternative of uploading your large files to their online storage services (e.g. Google Drive), and then place a link to the file in the email when it has finished uploading.
Since the files themselves are not actually being sent with the email (just the link to the files is sent), this allows for much larger 100s of MB files to be shared.
Delivery failures
Be aware that even though Gmail etc. may let you send attachments up to 25MB within mails, some email services may have lower limits, even for incoming emails. This can be especially true if you’re sending mails to corporate or commercial email addresses, where there are often more restricted limits in place.
- If your email is over the recipient’s attachment size limit, you will in most cases receive an error message back from their mail system stating this. Note that this only means that the delivery failed to that specific addresss – if you have sent the mail to a group of other people then they most likely received it fine, and it doesn’t need to be re-sent to them.
- In this case, you can try again but attach the file using Google Drive, Dropbox or OneDrive.
We’ll go through the process of attaching our .zip archive file in each of Google Mail, Outlook and Yahoo mailers:
Gmail

- Start a new mail, and click on the paperclip icon to attach files.
The attachment size limit for Gmail is 25MB, however, if your file is larger than this, it will ask you if you want to send it using Google Drive, where the file size can be up to 10GB (10000MB). - If you’re sending using Google Drive, it will show you the files you have currently uploaded. So click on the “Upload” tab and select the file to upload again if necessary, and click on the blue “Upload” button below.
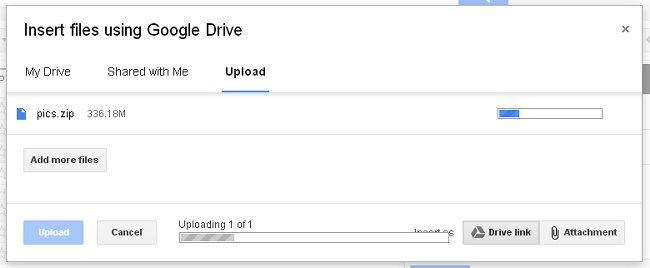
- You will need to leave the browser tab open in either case while uploading, however it will continue uploading in the background if you simply switch to another tab or window.
- When the upload is finished, if you are attaching the file with Google Drive, it may ask you if you want to share this file with the recipient. Clicking on the default option here, “Share & Send” should be ok in most cases, it means that the person you’re sending the file to can see that file on your Google Drive storage area, but not any other files you may have there (unless you previously shared them).
In this case, the recipients don’t need a Gmail or Google account to see your attachment once it’s shared, in fact they just need the link in the email. Be aware that access to your file is just like a normal attachment or image link – if the email is forwarded again, other recipients can click on and access or download the file attachment from Google Drive. - If you select “Send without sharing”, the recipient may have to go through a further step of requesting access to the file. This may be useful where you need to send a file link to a group of people, but you only want to grant access to someone if they then specifically request it after they click on the link. In this case, the recipient will need to login to a Google (but not necessarily Gmail) account in order to request access.
A slightly confusing new feature in Gmail is the ability to send files stored on Google Drive as a standard “Attachment” instead of “Drive Link” (see example below).

This Attachment option is largely pointless for files that are not already on Google Drive, since you can just click the paperclip icon in Gmail to upload attachments directly, however if you’re in the habit of using Google Drive to store your files (for example, Chromebook users), this might be a useful option, since normal attachments remain permanently with the email they were sent with, whereas you might delete some files on your Google Drive at some stage, which could prevent shared files from being accessible at some stage in the future.
Outlook.com (aka Hotmail)

- Create a new email, then click on the “Insert” option from the menu at the top. If your total file size is less than 25MB, select “Files as attachments” and upload the file.
- If your files are greater than 25MB, it will prompt you to use OneDrive, which is Microsoft’s online storage service. It’s slightly less integrated with email compared to Google’s version, since one you arrive at the OneDrive page, you’ll need to select the file for uploading once again, so if you know the file is too big to be sent as an attachment, it’s better to select the “Share from OneDrive” option in Outlook when composing your mail.
- After uploading, the file will appear on the OneDrive page, however now you have to go back to your email in Outlook.com, and select “Insert” and “Share from OneDrive”. You can then select the file to send with the email.
Yahoo mail

- Although it was reported some time back that Yahoo had got rid of attachment limits in email, this isn’t exactly true. For files over 25MB, you’re prompted to use Dropbox to store the file before sending the email.
- This works in much the same way as the Google and Microsoft online storage services – you can access the files later as a separate virtual drive or folder on your computer, but the recipient doesn’t necessarily need any login details to be able to open the files you send them in an email.
Alternatives to using email
The universal nature of email is still a huge feature compared to other services – you don’t need to ask anyone what software or system they’re on before sending files to them.
However many people find that dedicated file applications are a better option when frequently sharing files with the same recipient or group.
- Social networks and photo sharing sites such as Facebook, Google+, Flickr, Picasa and Instagram. These sites will usually let you organise photos into albums, and set access permissions for different people. They tend to be better suited for sharing photos on a periodic, social basis, instead of sharing a lot of photos at once.
- Messaging services such as Skype can often transfer files, however this usually requires that the other user is online at the same time.
- Using online storage services such as Google Drive, Microsoft OneDrive, Apple iCloud Photo Sharing and Dropbox outside of email. These services are designed to make files easily accessible, and can be very efficient when each party is using them to the full extent (for example, downloading the client program on each service in order to add a remote folder to their system).
Image credits: Waterfall photo courtesy of Gareth Thomas (Creative Commons 2.0 BY-ND license).
Microsoft Outlook icon courtesy dAKirby309.
Why is it sending part of the picture
i need to send photos to a email how do i do this please help
How do I send photo to company
Can anyone give an indication on how one can send a large file of photos? Downloaded the 7-Z and still cant, even after when I compressed it all into a zip file. I usually can sort myself out but this one is simply beyond me.
Using yahoo for mail and iPhone for Photos.
What’s the best way to reduce from latter to send via former?
I’m a complete luddite
Not sure that there is a best way, but one thing you could try is installing the Google Photos app on the iPhone.
It will then upload all of your photos to https://photos.google.com (may take some time).
When it’s finished, you can go to the above address in a web browser, then click on individual photos, click on “More options” and select “Add to a shared album”.
After creating the album, you can then get a link for sharing which you can send in an email.
Anyone clicking on the link will be brought to the shared album page.
If you want to share all of the photos without creating a shared album, you can click on the drop-down menu on the top-left of photos.google.com, then click Settings and “Shared libraries” to set it up.
Google doesn’t ask to send via cloud, it just refuses to send the email, saying “File size is too large, 25GB limit.”
I need to email several photos suing comcast.net. Help me .
I need to send several photos thru email
My respect and appreciation to the person or persons who wrote this guide. So well tuned to my questions and needs, which I hope are representative of many of us who aren’t dumb, and aren’t technophiles either. Thanks.
I have used picasa for years, and now can no longer send photos . Why stop or change something that worked so well. Now i dont know what to do….it has now become too complicated to send photos to family and friends especially not being computer savy.
What about using Flickr?
Thank you so much! The information is very helpful.
I had no problem sending pics to relatives, etc. with Windows XP. PLEEZE, someone bring back a user-friendly computer like Windows XP.
I don’t think it’s because people are computer illiterate are having trouble with the simplest of tasks as sending attachments, I think it’s because the people who are making them are making them for, perhaps themselves, rather than the average person. Makes me want to quit buying computers and go back to the good ‘ol cameras, even Poloroids, that make hard copies and send them via mail. This world is going too fast anyway.
Anyway, thanks for your help, sorry, I had to vent.
I will probably try some of your ideas on this crummy Dell Windows 10 computer.
AMEN!!!
You ain’t kidding, I loved XP, I hate Windows 10!
I too am not very computer literate. I am 64 and retired. I believe the negative of resizing is the image sucks for the person receiving. Especially if they want to view full screen or worse yet – print it.
And sending a lot of photos – my god – the time frame is ridiculous in terms of what it takes to work with the files.
And online services – well – you get minimal free space then you are stuck joining / buying space and uploading a lot of photos will take forever.
I think it is way easier to get a large capacity thumb drive and copy the photos then MAIL it ! You will spend I/100 the time.
Thank you. It was most helpful. I am 80 years old and am very comnputer illiterate.
Best Regards
Richard Chia
That is foolishness, Google is just outdated. It takes forever to attach 2 GB of pictures. After all this upgrade…google is still unable to suit our needs
Picasa was still the best ever program to send all your photos , STUPID Google stopped suporting it , now to send Photos you have to log on to google , and google Photos is not much help ,
Thanks for a great resolution. It helps me to send more photos over email now.
Thank you for this guide. Very helpfull as many people send huge emails with original images from camera – often very large.
Few months back I found free tool called SqueezeFile (www.squeezefile.com), which does most of what you. Right-click on photo allows you to resize and optimize it to preffered size. What’s more it contains an Outlook add-on which allows you to optimize attachments at the time of composing message and there’s no need to preprocess files before adding them into email. It also works with pptx or docx files…
Sam
This is really helpful, it is always a big mess when i try to send large files of images…