
Free up Disk Space in Windows – 3 Easy & Effective Tools

Original photo by DaveOnFlickr
Getting the most out of your disk space means not being too concerned about using it when necessary – maybe a few extra games or a music collection would make a laptop much more useful when travelling.
However, it’s no fun attempting to copy some files over only to find out that you’ve no space left.
You’ll need some tools to really make it easier to find that elusive space to free up.
Here we’ll guide you through three of the most effective free applications to quickly analyse areas with unnecessary clutter.
Each tool takes a different approach to the disk space issue, so by combining all approaches, you can feel confident that you’ve squeezed as much value as you can out of your storage.
All of the apps listed here will work just fine with the free version offered, and we haven’t seen any sign of adware or any other unwanted toolbars etc bundled with the downloads.
Note: Most of the time after deleting files, you won’t see the amount of free disk space increase until after you empty the files from the Recycle Bin in Windows.
Make sure to backup any critically important files before using any of the methods listed here.
1 – Duplicate File Finder (Ashisoft)
Duplicate files are identical copies of a file that have exactly the same contents, but may have a different filename and date, or can be located in a different folder.
We find that duplicate files are more common with media file types such as photos, music and movies, and can often occur when you’re using a computer drive as a backup for a digital camera, or copying a lot back and forth between USB drives.
There are a number of Windows applications for finding duplicates, but we like the free Duplicate File Finder by Ashisoft for it’s simplicity and effectiveness.
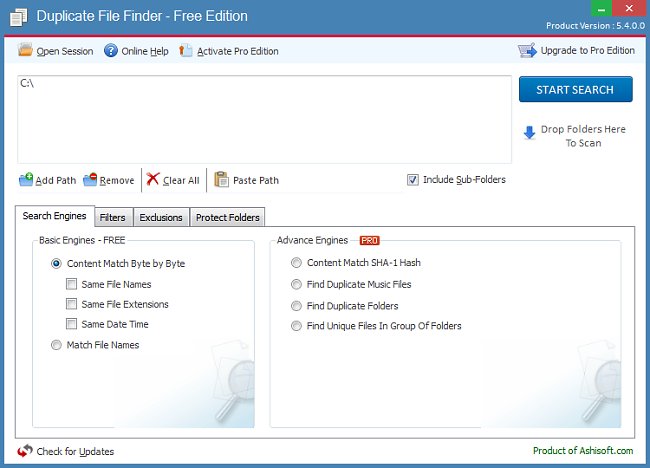
After downloading and installing, click on “Add Path” to select locations to scan for duplicates.
If you want to scan your entire disk, you should probably click on “Computer” here and select your local disk letter(s).
This can just be “Local Disk (C:)” in many cases, if you only have a single hard disk partition. All of the other options can be left at the default settings, and you can press “Start Search” to begin.
It may take a few minutes (or longer) to complete the duplicate search, depending on the speed of your system and disk.
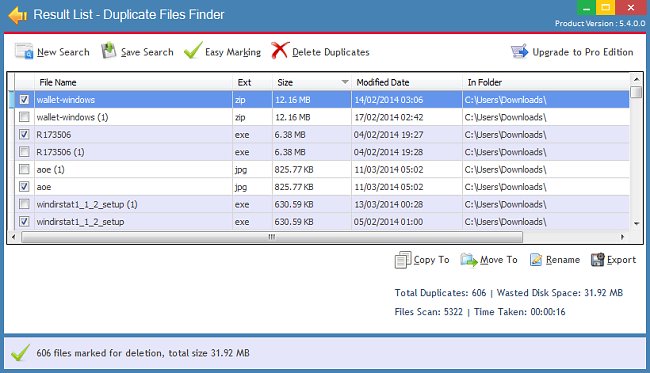
Once complete, the app will list all duplicates found and automatically select one or more duplicate for deletion.
However, the version it decides to keep may not be the one you would prefer to keep – it could be in the wrong folder, or have the wrong name etc. There are a few ways to approach this.
- If you just need to quickly free up some space and want to delete the biggest duplicates, you can click on “Size” to sort the files by biggest size. Deleted a few of the largest duplicates may be enough, depending on your requirements.
- An alternative is to simply manually scroll down through the list (originally ordered by the “Grp” tab on the far-right), and get an idea of folders which contain a lot of duplicates.
It’s typical to have entire folders of duplicate files, so if you do identify these, you can open Windows Explorer and delete as necessary.
Duplicate Downloads
Another target for duplicates is your Download folder, which can often contain multiple copies of the same files.
Repeat as Necessary
Once you’ve done your pruning, you can click on “New Search” on the results screen to perform a new scan and see how the situation has improved.
2 – WinDirStat
It’s unusual to find a piece of housekeeping software that is both at the same time beautiful to look at, and uniquely informative, but the unassumingly named (and completely free) WinDirStat manages both.
WinDirStat does something really simple – scanning your disk to find out how much space each file uses.
What is really useful though is how this raw information is presented.
Instead of a dry list of stats on a page, the authors have devised a unique graphical block representation of disk space usage, which is immediately easy to understand and allows you to quickly identify what programs, files, and even what types of files are taking up the most space.
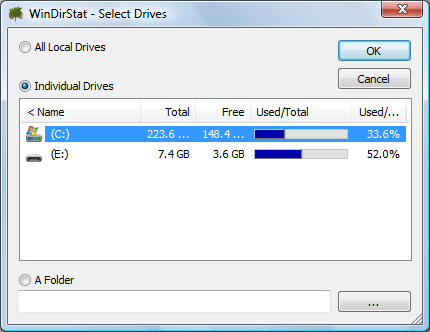
After installing and starting WinDirStat, you’re prompted for the drive letter to analyse. We’re just going to stick to looking at the main C: drive (image above).
The pacman animations will now spend a few minutes analysing files on your disk –
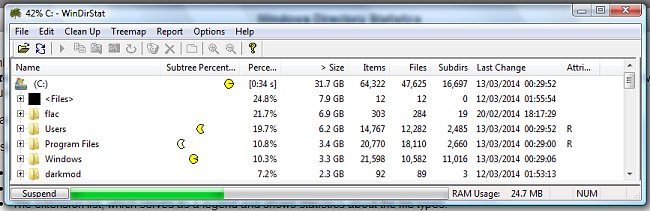
There’s not really much to see here until the scan is complete.
Now here’s the good part – multi-coloured, shiny boxes!
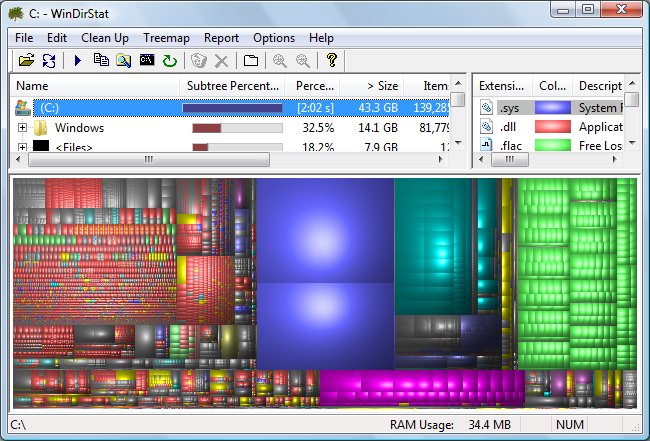
Each box represents a single file, and the genius here is that the size of the box is proportional to the size of the file.
Additionally, the boxes are grouped together based on their folder location, and you can hover the mouse cursor over each box to see the filename. This is an amazingly easy way to spot which files and folders are taking up disk space.
Even if you don’t need to free up disk space, but just want to learn more about how your computer works, the graphical display result of WinDirStat provides a fascinating view of how your files are organised.
Colour coding
In the example above, blue boxes represent system files, so the two big boxes are the system paging file, pagefile.sys, and a hibernation state file, hiberfil.sys. Clicking on a box highlights more data about that file in the text info window above the graphical display, so you can see the individual file size here.
Although these two files take up a large amount of space, they’re necessary system files so can’t be deleted.
However, looking at the rest of the graphic clearly shows some media files (in green) taking up a considerable amount of space. These could be a candidate for deletion if we needed to free up some space to install programs.
You can also delete files directly from WinDirStat by using an option after right-clicking on a file name in the text info box on top.
Free Space
Note that free disk space is not incorporated into the box view – the boxes are always packed into the most compact representation, even if you haven’t filled up the disk.
3 – CCleaner (Piriform)
CCleaner is the real deal in a world of fake registry cleaners that promise the earth and end up either doing nothing useful, or imploring you to buy the full version in order to do nothing useful.
Actually, a registry cleaner is not usually a great tool for freeing up disk space, however a useful feature of CCleaner is that it can also tidy up the flotsam & jetsam of temporary files, useless log files and numerous other files left over from software and driver installs.
These can add up to a significant amount of wasted space.

CCleaner can be a bit over-zealous on the default settings though, so a little care is needed when using it.
After starting it, you’ll see that it has checkboxes for areas to scan, split into a “Windows” tab and an “Applications” tab.
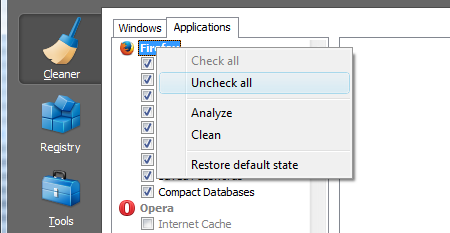
If you just want to free up some disk space without affecting anything else on your system, we recommend unchecking the “Internet Explorer” group by right-clicking on the heading and selecting “Uncheck all”. We’re just going to keep the default checkboxes under “System” selected.
Now click on the “Applications” tab. You’ll see any other web browsers and other applications listed here, if you have them installed.
Cache files
Again, we recommend unselecting the web browser checkboxes to avoid complicating things too much. You can select the “Internet Cache” box to possibly free up some space, but it will only be a temporary gain since the cache fills up again after using the browsers.
The same is true for some other apps like Google Earth which download cached data. In this case, we also unselect Google Earth, since the data is only re-downloaded to the cache any time it’s deleted.
Applications
CCleaner will have a number of applications, utilities etc. selected by default. It’s important to point out here that just because something is selected doesn’t mean that it will be deleted – an application being selected simply means that unnecessary and temporary files related to that application are analysed.
You can now safely click on “Analyze” to see exactly what CCleaner has decided is unneeded.
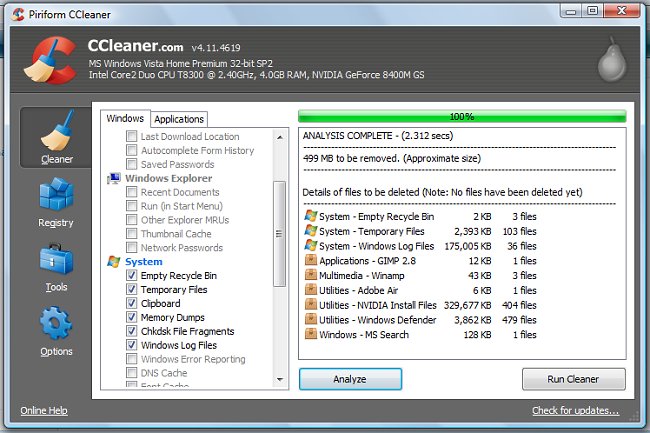
In our case, CCleaner has found almost 500MB of unnecessary files mostly related to System Logs and Graphics Driver install. That’s a significant saving on an SSD drive system!
If you are concerned at this stage about any of the files found, you can right-click on a group and select “View detailed results” to see all the files contained under that heading.
Once you’re happy, click on “Run Cleaner” to delete the files. That’s all there is to it!
Registry Cleaner
CCleaner also has a number of other features such as a registry cleaner. We’re not really convinced that registry cleaners are especially useful in most cases, however on older systems it can be worth running in order to reduce invalid references to missing files.
Did it work?
We think that the above three tools represent some of the best ways to help organise your free disk space, but maybe you’ve found a different approach that works for you?
Let us know in the comments below.
Of course, if you have an older laptop, it might be easier to just replace the disk. SSD drives offer huge performance benefits and now also large enough capacities for most purposes, typically 250GB.
Check out some popular SSD drives – make sure it’s a 2.5″ version if buying for a laptop.
I have uninstalled all Google Earth software and the plugin just because they are disk wasteful.
Google Earth can use up a lot of disk space since it caches the map data after downloading, so it can be used offline (at least for the part of the world that you were previously looking at).
You can change how much disk space this uses under the setting Tools->Options->Cache->Disk Cache however.
Try out
DuplicateFilesDeleter software, it works great.